FREE DELIVERY TO PICK-UP POINTS FROM €50
BACK-TO-SCHOOL KIT PPMC x ALVADIEM: Click here!


PPMC pour vous servir !

02 97 59 14 23

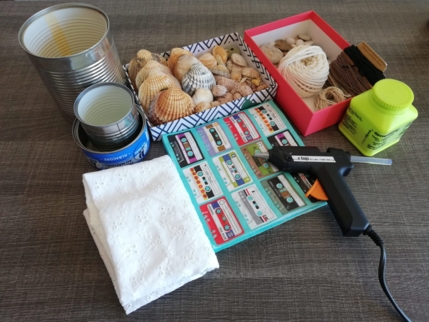
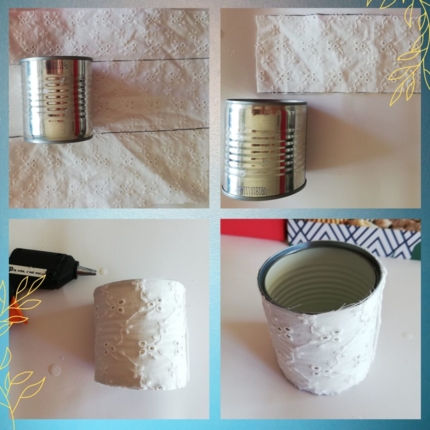
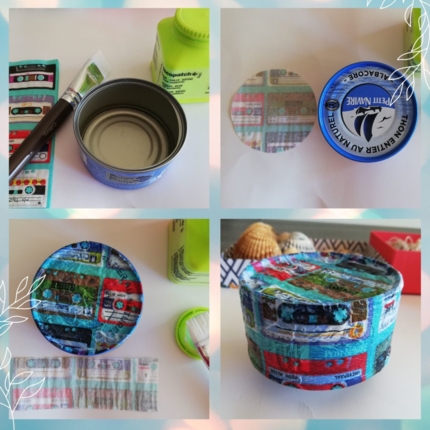
DIY Upcycling: Turn Your Tin Cans into Pretty Decorative Pots

Wondering how to recycle your tin cans? Nothing could be easier with this tutorial from Papa Pique et Maman Coud just turn them into decorative pots! Pencil holders, flower pots, or containers for your makeup brushes… This fun DIY is perfect to do with kids and gives a second life to something you'd normally throw away.
Difficulty level: (2/5)

What You’ll Need

For this easy project, you can use what you already have at home. In our version, we used:

  • Tin cans in various sizes
  • Rope or twine
  • Fabric scraps
  • Patterned paper napkins
  • All-purpose glue and a brush
  • A hot glue gun

Idea 1: The Rope-Wrapped Pot

To turn your tin can into a charming decorative object, you'll need some rope or twine and a hot glue gun.

Step 1: Start by adding a dot of glue at the bottom of the can and pressing the end of the rope into it.
Step 2: Wrap the rope around the can, row by row. Keep the coils tight together and secure them with a dot of glue every so often.
Step 3: Once you reach the top, glue down the end of the rope and trim any excess.

Your rustic, natural-looking pot is ready!

Idea 2: The Fabric-Wrapped Pot

This idea lets you upcycle both your tin can and your leftover fabric!

Step 1: Place the can on your fabric to measure how wide a strip you'll need.
Step 2: Cut out a strip that fits the height and circumference of your can.
Step 3: Apply glue along the side of the can and press the end of your fabric strip into place.
Step 4: Wrap the fabric halfway around the can, gluing as you go.
Step 5: Finish by folding the last part of the fabric neatly and gluing it to meet the starting point.

Quick, easy, and colorful!

Idea 3: The Paper Napkin Pot

If you have pretty napkins at home, now’s the time to use them!

Step 1: Trace the bottom of the can onto the napkin and cut it out. Do the same for the sides.
Step 2: Brush a layer of glue onto the outside of the can and press the napkin pieces in place.
Step 3: Add a second coat of glue on top of the napkin it’ll act like a varnish and help secure the edges.
Step 4: Let it dry upside down on a glass to avoid sticking to the table.

Voilà! You’ve just discovered the joy of upcycling with a creative twist.

Don’t forget to share your upcycled tin can pots with us on Instagram or Facebook using the hashtag #papapiqueetmamancoud.

Want more DIY ideas?
Visit the DIY Tutorials section of our blog to find more creative projects, like our bunting garland tutorial or the tassel bookmark.